Secure your website or web app with nginx and modsecurity (WAF - web app firewall)
By: Thanh Loyal - Last modified date: Wed Jun 18 2025
Have you ever
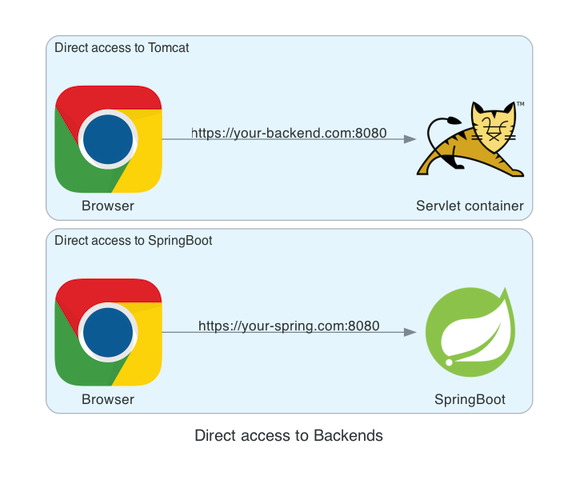
Have you ever deployed your backend application so that it faces the public internet directly, without any protection layer? If so, this isn’t considered a good security practice and leaves your backend vulnerable to external attackers. Let’s secure it with an affordable solution.
What we gonna do?
We’ll install nginx and compile ModSecurity into it. Nginx will act as a reverse proxy, and with ModSecurity’s support, it will help filter out malicious requests before they reach your backend.
PART 1: COMPILING AND INSTALLING
1. Install dependencies
We need to install the following dependencies in order to build nginx and ModSecurity from source code
# Go to temporary directory
cd /tmp
# Download nginx source code from nginx download page
curl https://nginx.org/download/nginx-1.28.0.tar.gz -O
# Decompress it
tar -xzf nginx-1.28.0.tar.gz
You’ll also need to clone ModSecurity from GitHub:
I got this configuration by first installing nginx using dnf (dnf install nginx), then running nginx -V to see the compilation parameters that were used in the official package.
3.1 Make it
# Run make to actually compile the source code. This might take a moment
make
Install
# And then install it
make install
4. Create nginx user
A dedicated user account will be used to run nginx process
[Unit]
Description=The nginx HTTP and reverse proxy server
After=network-online.target remote-fs.target nss-lookup.target
Wants=network-online.target

[Service]
Type=forking
PIDFile=/run/nginx.pid
# Nginx will fail to start if /run/nginx.pid already exists but has the wrong
# SELinux context. This might happen when running `nginx -t` from the cmdline.
# https://bugzilla.redhat.com/show_bug.cgi?id=1268621
ExecStartPre=/usr/bin/rm -f /run/nginx.pid
ExecStartPre=/usr/sbin/nginx -t
ExecStart=/usr/sbin/nginx
ExecReload=/usr/sbin/nginx -s reload
KillSignal=SIGQUIT
TimeoutStopSec=5
KillMode=mixed
PrivateTmp=true

[Install]
WantedBy=multi-user.target
6. Clone the core rule set
The steps above make nginx available and ready to serve. While ModSecurity features are now available, they work by following specific rules. Without rules, ModSecurity does nothing. So let’s gather rules from OWASP (Open Web Application Security Project) and place them on our server:
# Go to /tmp directory and clone. # So that files will be downloaded into '/tmp/coreruleset'
Create file /etc/nginx/ModSecurity/modsec_includes.conf with the following content:
include /etc/nginx/ModSecurity/modsecurity.conf
include /etc/nginx/ModSecurity/owasp-modsecurity-crs/crs-setup.conf
include /etc/nginx/ModSecurity/owasp-modsecurity-crs/rules/*.conf
This includes.conf file will be used in an nginx directive, which we’ll configure shortly. The modsecurity.conf file contains the base setup for ModSecurity and comes from the OWASP ModSecurity project. We don’t have this file yet, so we’ll need to download it next. The crs-setup.conf file also contains base setup for ModSecurity, but it’s specifically designed to work with the Core Rule Set. As you saw in step 7, this file comes from the OWASP Core Rule Set project.
10. Download the base configuration file
Clone this repository
cd /tmp
git clone https://github.com/owasp-modsecurity/ModSecurity.git

# And checkout the branch v3/master
git checkout v3/master
Then copy the configuration file to the correct location:
By default, ModSecurity only detect malicious requests but does not block them. You may want to change this behaviour by editing modsecurity.conf
# /etc/nginx/ModSecurity/modsecurity.conf
SecRuleEngine On
11. nginx.conf main configuration file
Check /etc/nginx/nginx.conf and make sure it contains a line that instructs nginx to include all configuration files from other locations. It should contain the line below or something similar:
# nginx.conf
include /etc/nginx/conf.d/*.conf;
12. Check the setup at current stage
At this point, the configuration is basically complete and nginx should function correctly. You can test it by running:
nginx -t
It should print a message indicating that everything is working properly:
nginx -t
nginx: the configuration file /etc/nginx/nginx.conf syntax is ok
nginx: configuration file /etc/nginx/nginx.conf test is successful
CONFIGURE A SITE
Now we should be able to configure a specific site that is protected by ModSecurity
Create your site’s configuration file:
touch /etc/nginx/conf.d/th-loyal.com.conf
Its content: server { server_name ; root /usr/share/nginx/html; index index.html;
modsecurity on;
modsecurity_rules_file /etc/nginx/ModSecurity/modsec_includes.conf;

# ... other configuration